Tasks
Hand out labeling and review work on a repository, follow its progress, and see every task in a project in one place.
A task hands a set of a repository's images to one person with a due date. It records who is labeling what, how far they've got, and when it's due. The assignee is notified as soon as the task is created.
There are three kinds:
| Type | What it's for |
|---|---|
| Labeling | someone labels a set of images |
| Review (created as Quality Review) | someone checks labels that were already drawn and marks them correct or incorrect |
| Issue | a problem raised on one image or one label, created from the labeling canvas |
Reviewing and issues are covered in Reviewing Labeled Work.
Open a repository's tasks
Open the repository and click Tasks in its header. The Dataset Tasks page lists the tasks on the version you're viewing.
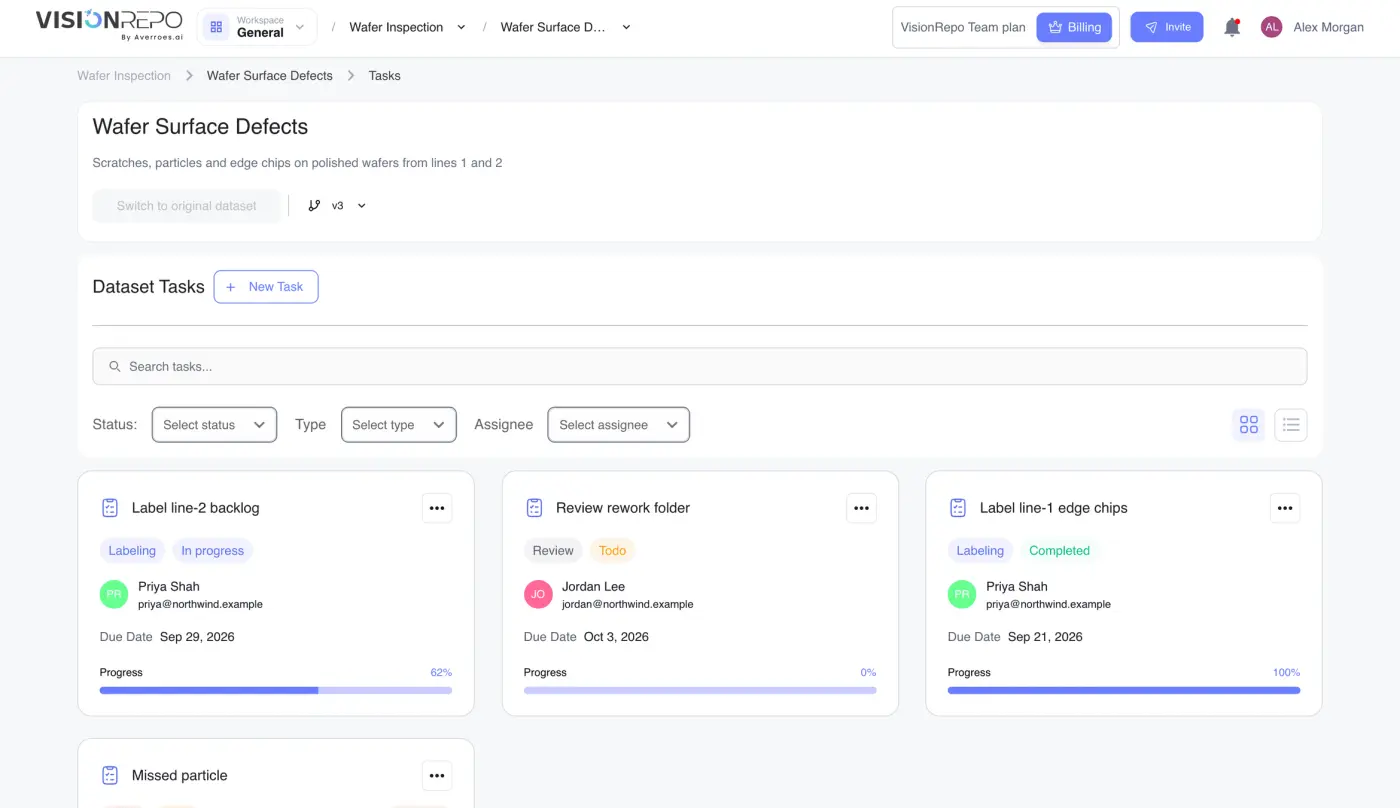
If your plan doesn't include tasks, Tasks opens an upgrade prompt instead. If your role can't read tasks, the button is disabled and its tooltip names the missing permission.
Read a task card
Each card shows the task's name, a type chip, a status chip (Todo, In progress or Completed), who it's assigned to, its Due Date and a Progress bar. Issue tasks have no progress bar. An Overdue chip appears once the due date has passed on a task that isn't completed.
Use the filter row to narrow the list: Search tasks... by name, Status, Type (Labeling, Review or Issue) and Assignee. Clear All Filters resets them.
The buttons at the end of the row switch between cards and a table. The table adds a Draft column (whether the task was made on the draft), and a Reporter column for who created it.
Create a labeling task
- On the Dataset Tasks page, click New Task.
- Under Select Task Type, keep Labeling.
- Enter a Task Name.
- Pick a Due Date. The earliest you can choose is tomorrow.
- Choose someone under Assign to. The list holds the people with access to the repository.
- Add a Description (Optional) if the assignee needs context, such as which defects to look for.
- Under Select Media Items, choose how many images the task takes (see below).
- Click Create Task.
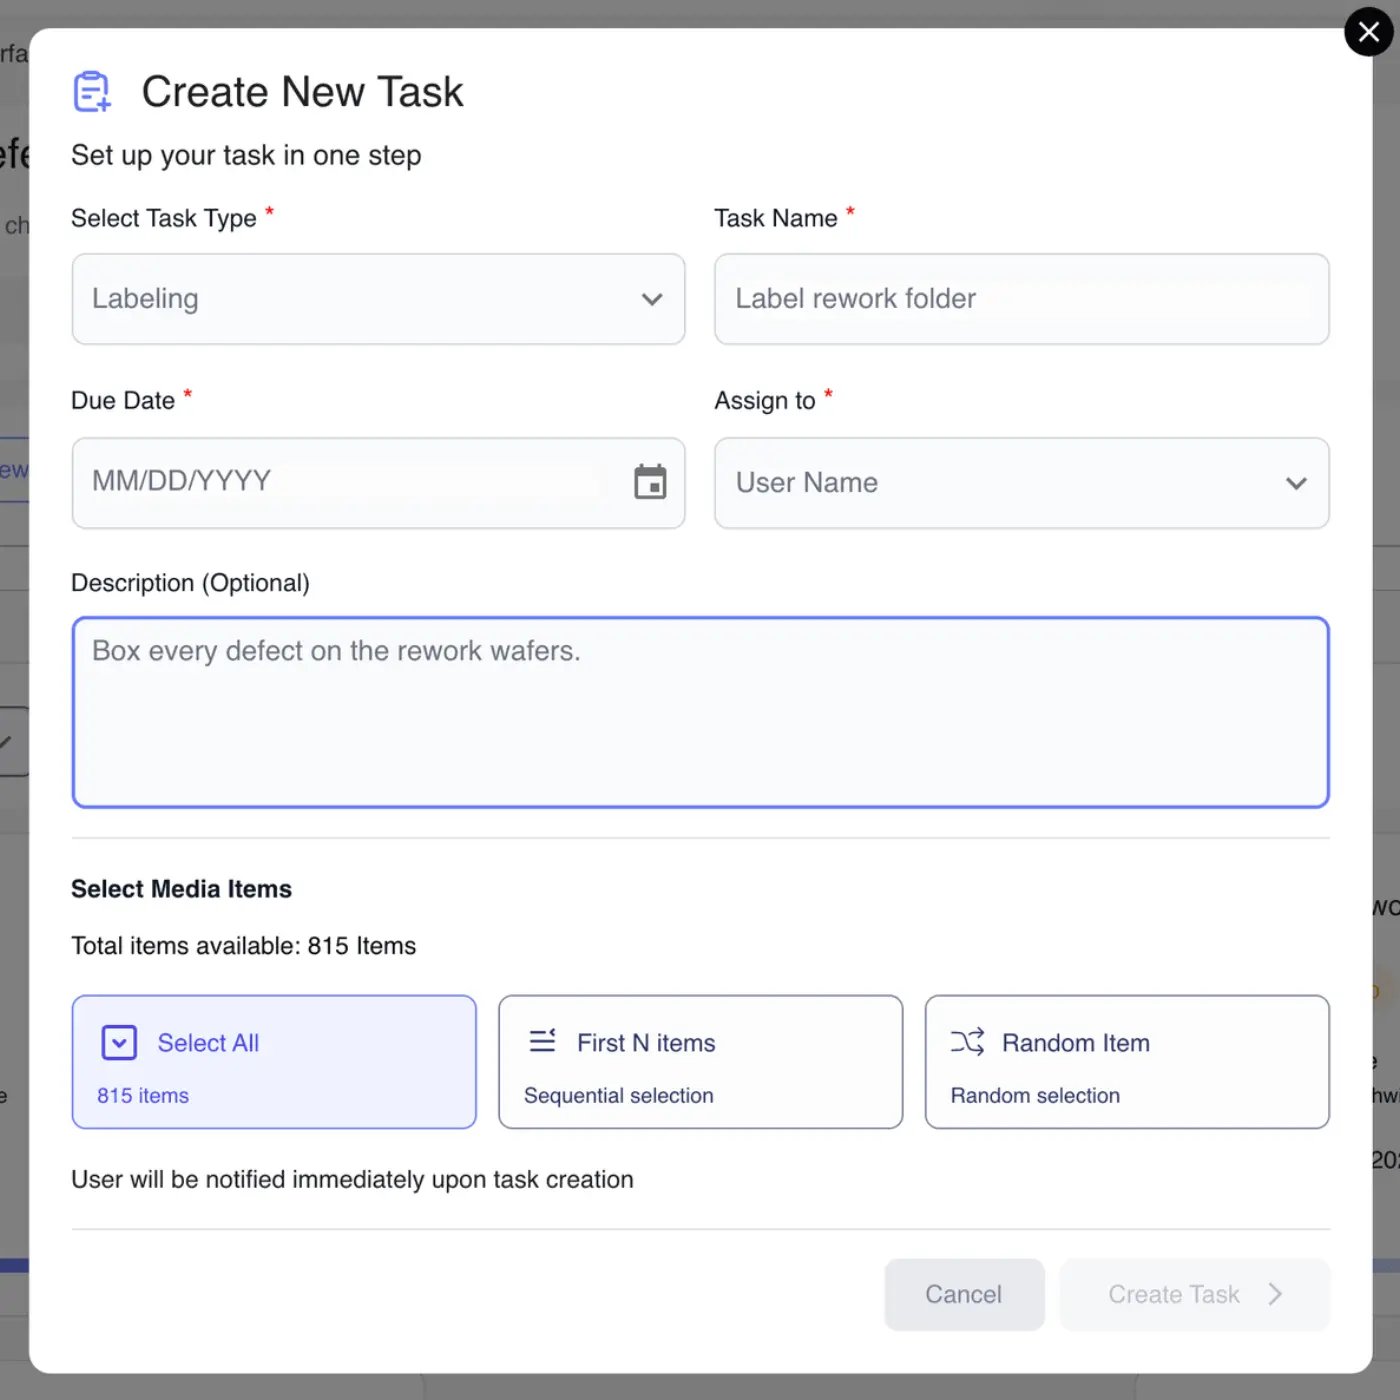
New Task only shows if your role can write tasks.
Choose how many images a task covers
Total items available is the number of images not yet assigned to another task of this type, so it's usually smaller than the repository.
| Option | What it takes |
|---|---|
| Select All | every available image |
| First N items | the first N available images, in order |
| Random Item | N available images picked at random |
With the last two, type a number or use the arrows; the caption reads how many you've taken out of the total. Create Task stays disabled while the count is zero, or while the name, due date or assignee is missing.
If nothing is available, the three options grey out and a warning explains why: No media available for labeler task when every image is already assigned, or No media available for quality review task when nothing has been labeled or assigned yet.
Assign selected images or a folder
You can also create a task straight from the repository's media:
- Select images or folders, then click Assign tasks in the selection bar. The dialog opens with your selection as the task's images, so the three options above don't appear.
- Or open a folder's three-dot menu and choose Assign task to create a task over that folder, such as
line-2.
Both need permission to write tasks. If your plan doesn't include tasks, Assign tasks offers an upgrade instead.
Create a review task
A review task checks the work of a labeling task, so you start it from that task.
- Open the three-dot menu on the labeling task's card (or More in the table view).
- Choose Create Review Task.
- Enter a Task Name, a Due Date and who to Assign to, plus an optional description.
- Click Create a Review Task.
The dialog shows the Linked Labeling Task and who labeled it. There's no media section, because the review covers the labeling task's images. Create it once the labeling is finished; the menu doesn't stop you from creating one earlier.
You can also make a review task with New Task by choosing Quality Review and picking how many images it takes, the same way as a labeling task. It draws from images that have already been labeled; if there are none, the dialog says so.
Open a task
Click a card, or choose Explore Task from its menu.
The row under the name shows Type, Status, Due Date and Assignee, with Overdue at the end when it applies. The tiles below count Images, Correct and Incorrect. Correct and incorrect only come from reviews, so they read N/A on a labeling task. Issue tasks don't show the tiles.
The images below can be searched, filtered by Status, Label and Labeler, and sorted by Name, Upload Time or Last Labeled Time (pick the same field again to flip the order). On a review task, Status filters by Reviewed or Not reviewed instead of Labeled or Unlabeled.
The table view shows each image's Label, Status, Last Modified date and, on review tasks, a Review column reading Correct, Incorrect or Pending. Images that are still processing, being deleted, or are videos can't be opened from the table.
Click any image to open it on the labeling canvas. The thumbnail strip then only holds the task's images, so you can work through the task without leaving it.
The draft buttons and version selector in the header belong to the repository, not the task. See Drafts and Collaboration.
Change a task
On the task's page:
- Click Edit next to the name to rename it.
- Click the pencil at the end of the details row to change Status, Due Date and Assignee, then the tick to save or the cross to cancel.
Setting a task to Completed while it's below 100% asks first, in a Change task status to complete dialog that shows the current progress. Click Complete to go ahead. Issue tasks complete without asking.
In the table view you can also double-click a row, or choose Edit from More, to change the name, status and assignee in place.
The task type and description can't be changed after creation. Editing needs permission to write tasks.
See a task's summary and analytics
Two more items in a task's menu give a quick look without opening it:
- Task Details shows who it's assigned to, the due date, progress, Total Images, Completed and Remaining (plus Rejection Rate on review tasks), who created it and the description. View Task opens it.
- Analytics opens a panel with the task's progress, the image counts, a Labels status chart and a count of labels by class.
Delete a task
Choose Delete Task from the card's menu (or Delete in the table) and confirm. This removes the task, not its images, which stay in the repository. Deleting needs permission to write tasks.
Track every task in a project
The Tasks Management page collects the tasks from every repository in a project. Open the project's overview and click the tasks icon at the top right, next to the settings icon.
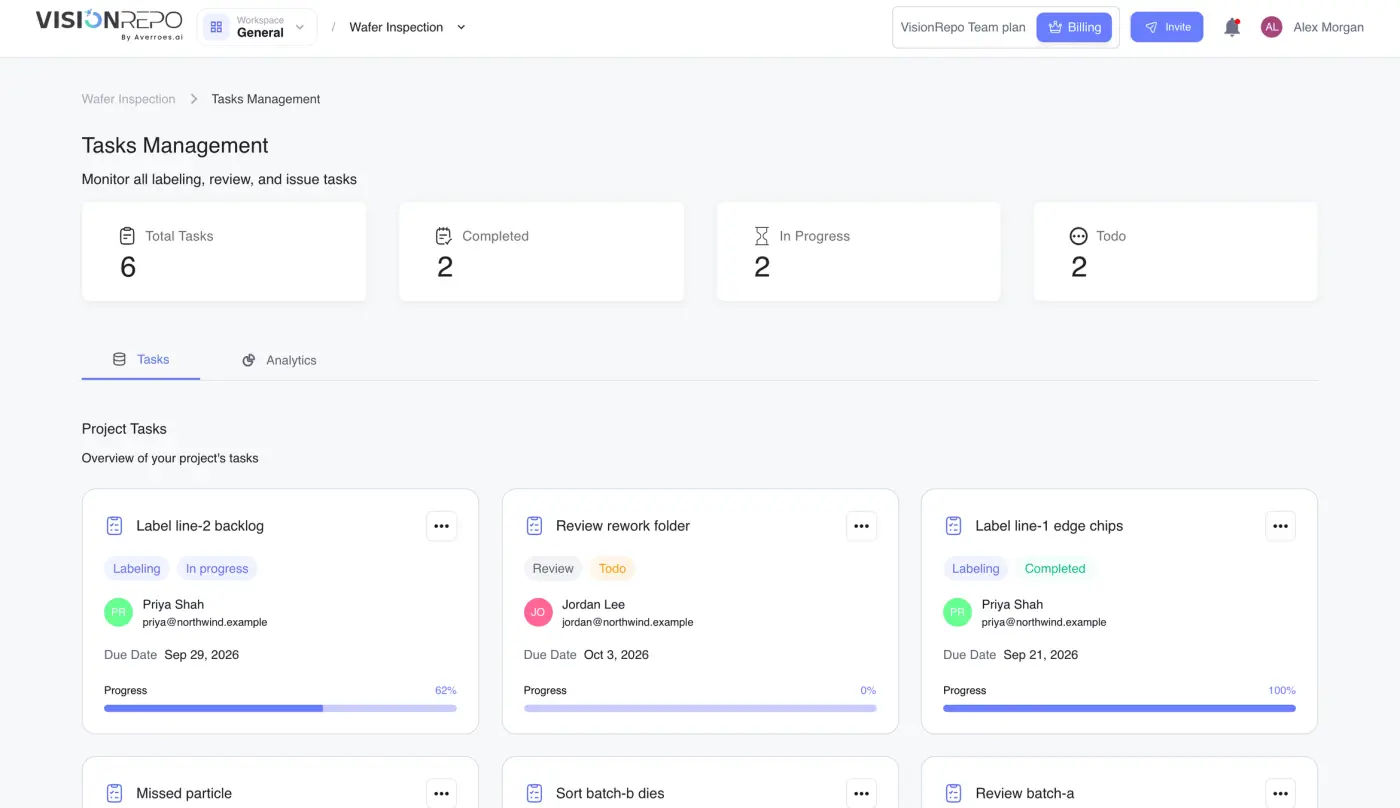
Four tiles count Total Tasks, Completed, In Progress and Todo. Below them:
- Tasks lists a card per task, whichever repository it's in, with Explore Task, Task Details, Analytics and Delete Task in its menu.
- Analytics has a table of everyone with tasks, with their Rejection Rate, Accuracy Rate and number of tasks assigned, and a Task Overdue Count chart split by labeling, review and issue tasks.
The page needs permission to read tasks, and your plan must include tasks.