Organizing Media: Folders, Filters, and Bulk Actions
Create and manage folders, find media with search, filters and sorting, and move, copy, assign or delete many items at once.
A repository's Dataset tab is where its media lives. Folders divide it, filters narrow it down, and selecting items lets you move, copy, assign or delete many of them in one go.
Use the quick actions
The card at the top of the tab starts with Quick actions:
- Create new folder makes a folder inside the one you're in.
- Upload more medias opens the upload dialog; see Upload and Import Data.
- Split current directory makes new repositories out of the folder you're in (see the last section).
All three are disabled if your role can't change media.

Work with folders
Folders appear as cards before the media. Click one to open it; the breadcrumb above the repository name grows a step you can click to go back up. The grid, counts and filters all apply to the folder you're in.
A folder card shows the folder's name and description, where its media came from, a status such as Ready or Processing, and when it was last updated. It has two buttons:
- Analytics opens the folder's charts in a side panel without leaving the page.
- Build a Model opens the training dialog scoped to this folder. See Build a Model.
The three-dot button on the card holds the rest:
| Item | What it does |
|---|---|
| Assign task | Create a labeling or review task for the folder |
| Dataset | A submenu with Copy dataset, Move dataset and Split dataset |
| Metadata | Add a description and tags |
| Info | Count the folder's files, their total size and the annotation types in it |
| Delete | Delete the folder and everything in it |
To create a folder, click Create new folder, type a Folder name in Create Folder, and click Save.
Search and filter media
The search box (Search images, videos, folders...) matches names as you type. The filters under it narrow further:
- Status: Labeled or Unlabeled.
- Label: media with any of the classes you pick.
- Labeler: media labeled by the people you pick.
- Tags: media carrying the tags you pick.
Each active filter shows as a chip, such as Label: scratch, so you can see why the grid is shorter than you expect. Remove one chip to drop that filter, or click Clear All Filters to drop them all.
Filters also scope the Analytics tab, downloads of filtered items and splits of filtered items.
Build an advanced filter
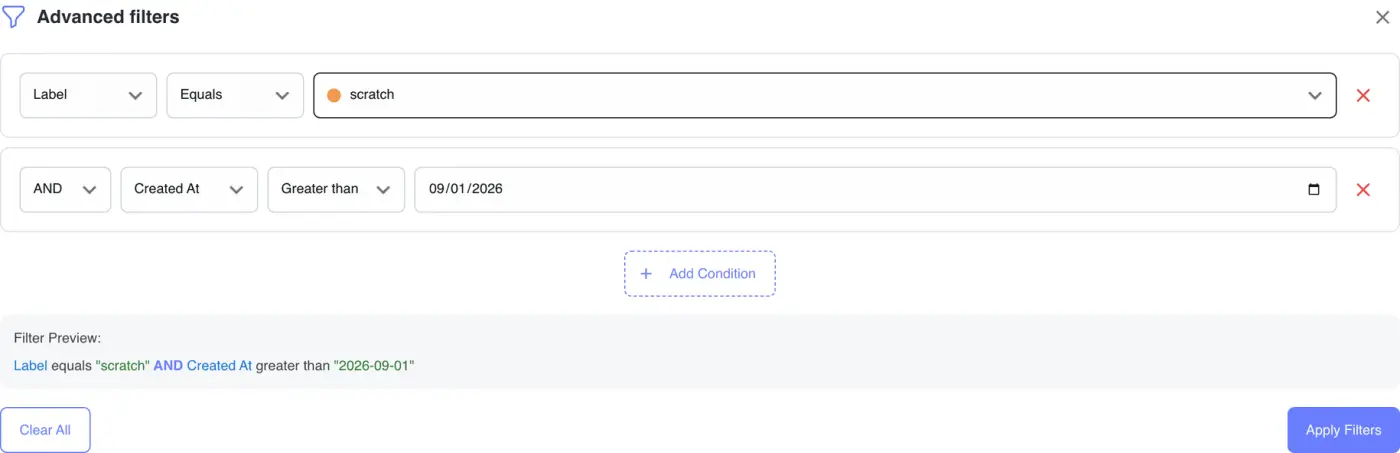
Advanced filters lets you combine conditions, for example everything labeled scratch that was created after a certain date. It needs a plan that includes it; otherwise the button opens an upgrade prompt.
- Click Advanced filters, then Add Filter Condition.
- Pick a field, an operator and a value.
- Click Add Condition for another row, and choose AND or OR to join it to the row above.
- Check the Filter Preview: line, which spells out the whole query.
- Click Apply Filters.
| Field | Operators offered |
|---|---|
| Name | Equals, Not equals, Starts with, Ends with, Contains |
| Label, Tag | Equals, Not equals, Is empty, Is not empty |
| Annotation Type | Equals, Not equals (Image classification, Bounding box or Polygon) |
| Last Modified, Created At, Labeled At | Equals, Not equals, Greater than, Less than, Is empty, Is not empty |
| Size (Bytes) | Equals, Not equals, Greater than, Less than |
| Status | Equals (Labeled or Unlabeled) |
Apply Filters stays disabled until every row that needs a value has one. Clear All in the panel removes the conditions. While advanced filters are on, the button shows how many conditions are active.
Sort, pin and change the view
- Sort offers Name, Upload Time and Last Labeled Time, each with an up or down arrow for the direction. The button shows the current order.
- The Pinned: switch shows only the images you've pinned. Pin an image with the pin icon on its card; use it to mark images you want to come back to.
- The two icons at the far right switch between a grid of cards and a table. Your choice is remembered in this browser.
The pager under the grid lets you show 12, 16 or 20 cards a page.
Select many items
Tick the checkbox on a card, or on a folder card, to select it. Select all selects everything on the current page, and a line under the toolbar says how many items are selected on this page.
To go beyond the page, click Select all followed by the item count and in repository on that line. That selects every item the current filters match, across all pages. Deselect all, or pressing Esc, clears the selection.

Move, copy, assign or delete a selection
With something selected, the toolbar offers four actions:
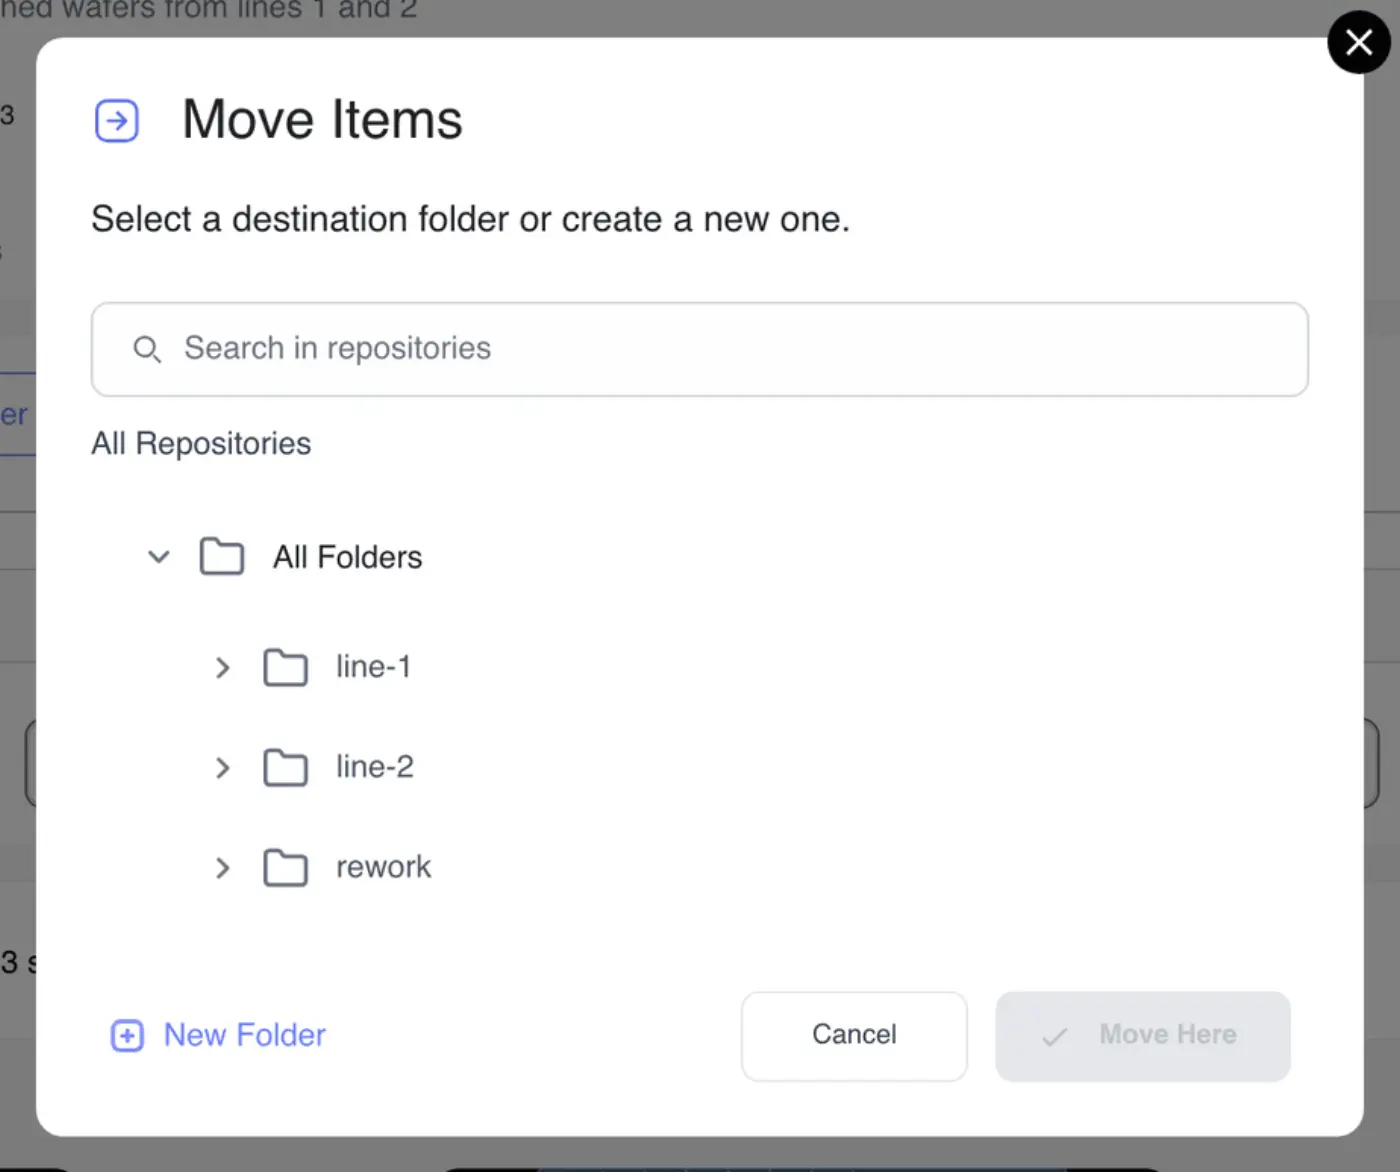
- Move and Copy open a folder picker.
- Assign tasks creates a labeling or review task for the selection. It needs permission to create tasks and a plan that includes tasks. See Tasks.
- Delete selected deletes the selection.
In Move Items or Copy Items, pick a destination folder in the tree. All Folders is the top of the repository. Narrow the tree with the search box, or click New Folder to create a destination on the spot, then click Move Here or Copy Here.
Deleting asks how far to go, in Delete Items:
- Delete This Version Only removes the items from the version you're on and keeps them in other versions.
- Delete All Versions removes them from every version. You type
deleteto confirm.
Large moves, copies and deletes run on the server. A banner above the grid reads, for example, (240) items are currently being transferred, and the grid refreshes as the work finishes.
Act on a single image or video
The three-dot button on a card holds:
| Item | What it does |
|---|---|
| View | Play a video (videos only) |
| Annotate | Open the image in the labeling tool. For a video, available once its frames have been extracted. |
| Copy, Move | The same folder picker as above, for one item |
| Metadata | Add a description and tags in Add metadata |
| Delete | Delete this item, with the same version choice as above |
Moving, copying, metadata and deleting need permission to change media, and Annotate is hidden without it.
Clicking a card opens the image in the labeling tool (see Labeling Images). A TIFF image opens TIFF Image Options instead, with Download TIFF and Convert to PNG, because browsers can't display TIFF. A video opens a player first.
In Add metadata, type tags and press Enter, or pick tags already used in this repository. Tags then become something you can filter on. In a classification repository, each card also has a class picker so you can classify an image without opening it.
Split a folder into new repositories
Splitting makes new repositories from what's in a folder, for example a training set and a hold-out set.
- Click Split current directory, or Dataset then Split dataset on a folder card.
- In Create a New Dataset, choose All items or Filtered items only.
- Pick a method:
- Split by percentage divides the items into two new repositories. Set the ratio with Split percentage.
- Clone datasets copies everything into one new repository.
- Random sampling copies a random set of items. Set how many in Splitting images count.
- Check the names under Configure new repository(s).
- Click Create Dataset.
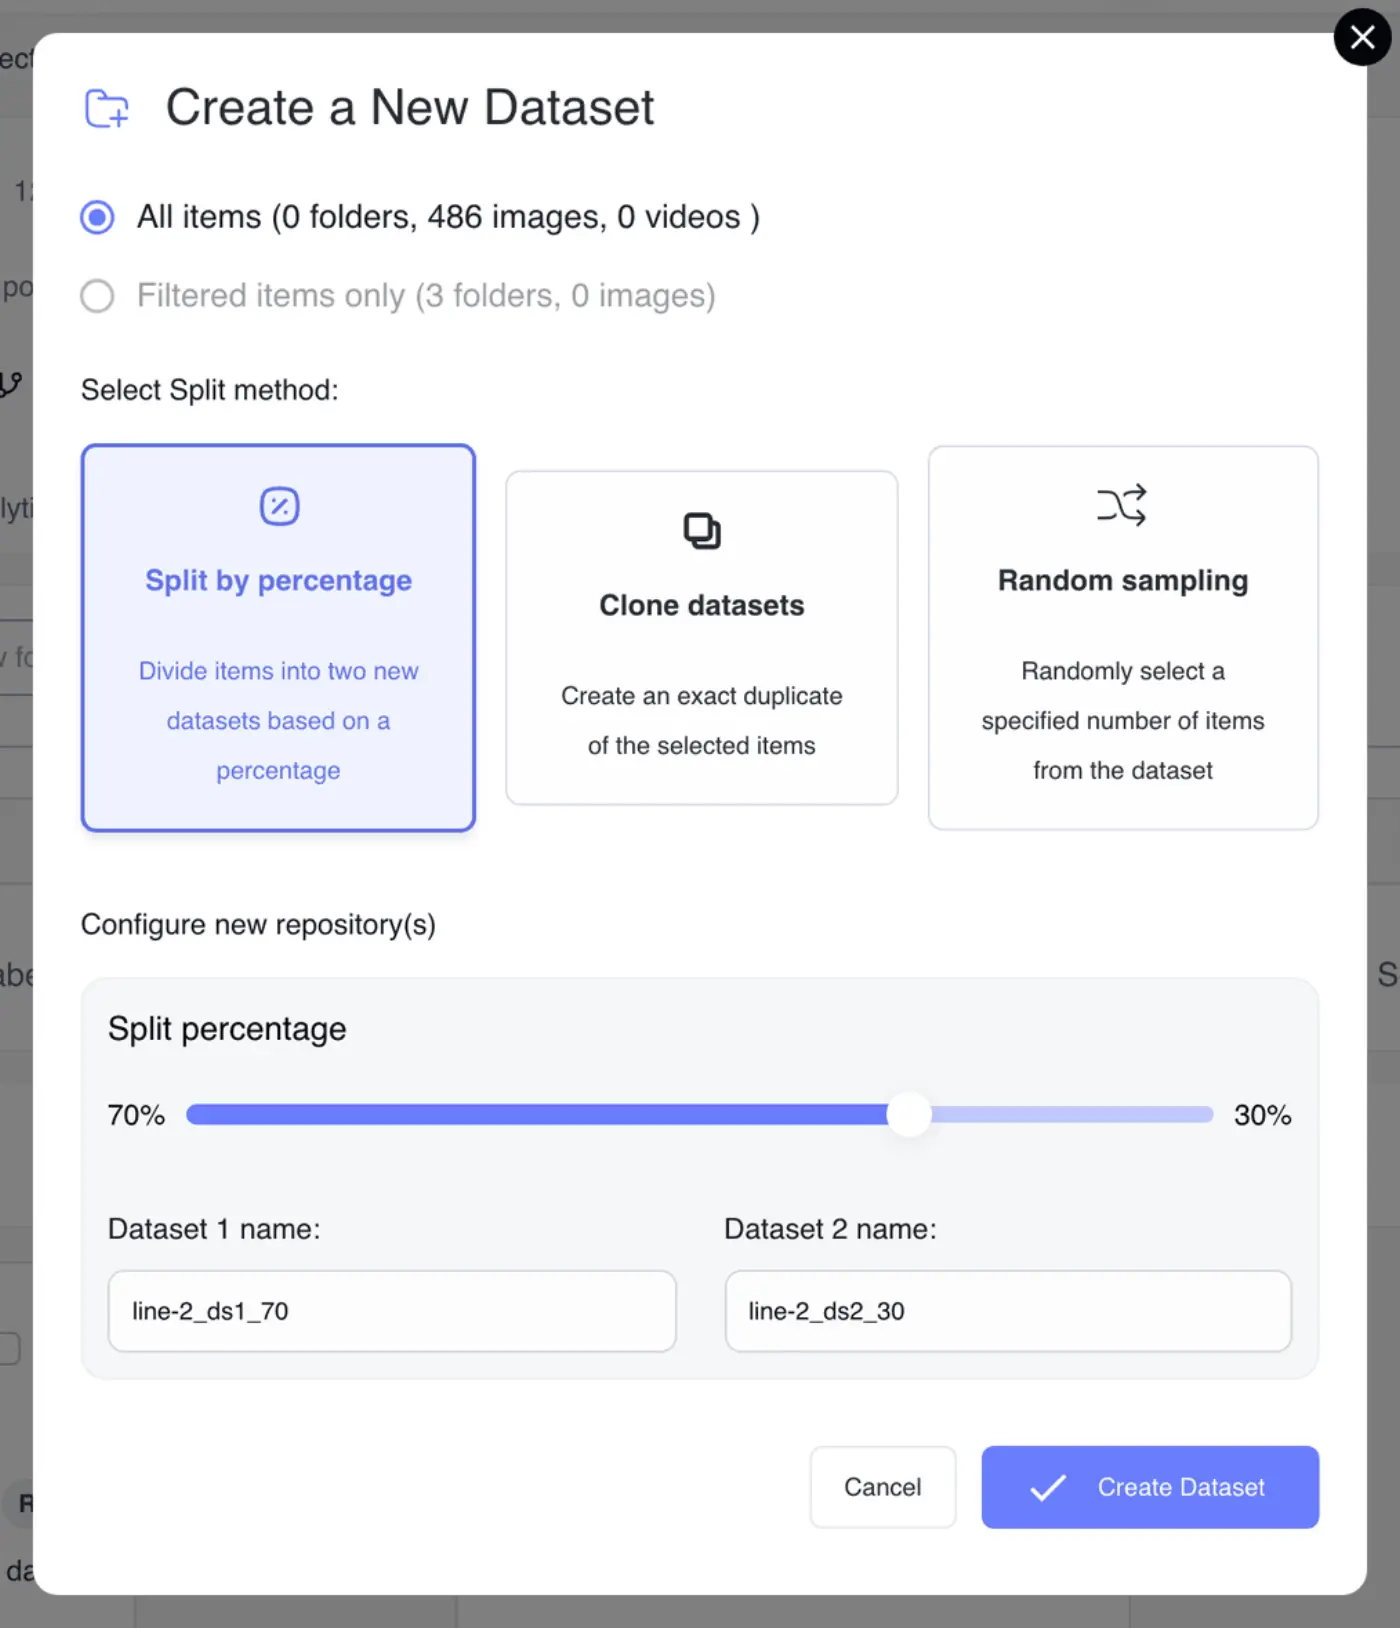
Names are suggested for you, based on the folder's name when you start from a folder card and on the repository's name when you use Split current directory. Splitting the line-2 folder 70/30 suggests line-2_ds1_70 and line-2_ds2_30; a clone gets _cl added and a random sample _ra. You can type your own.
Split by percentage and Random sampling need at least 10 items. With fewer, only Clone datasets is available, and hovering the others says This dataset has less than 10 medias.