Labeling Images
Open the labeling canvas, draw and edit objects, and move through a repository's images.
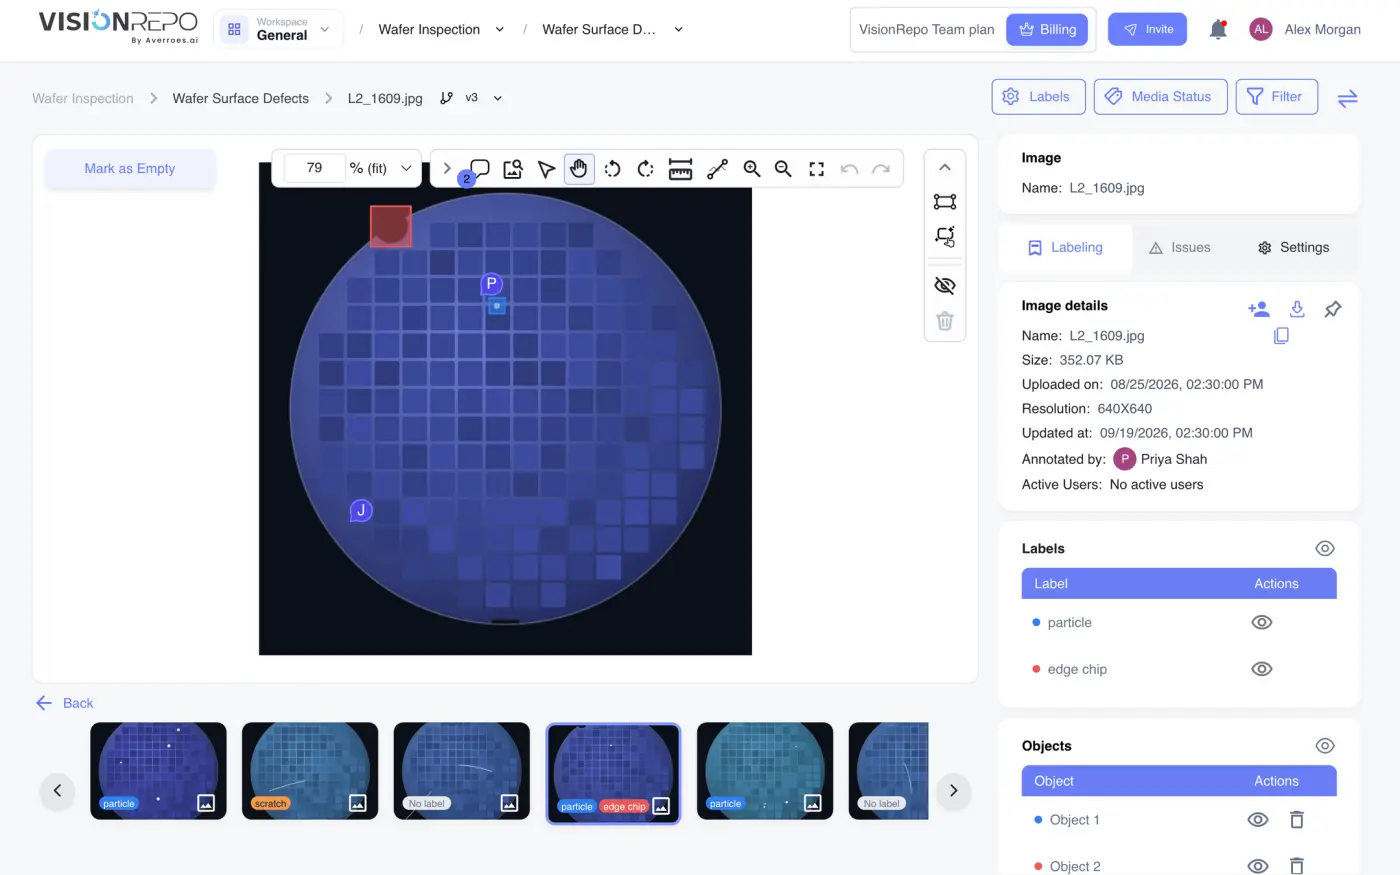
The labeling canvas is where you draw on an image and say what is in it. It shows one image at a time, with the rest of the repository in a strip of thumbnails beside it.
Open an image for labeling
Open a repository and click any image. The canvas opens on that image, with the repository's other images (inside whatever filters you had applied) in the thumbnail strip.
If you click a folder in the strip, the canvas shows Select a folder to view its images until you pick an image inside it. A Back link above the strip takes you up one folder.
You need permission to read media to open the canvas at all. Without permission to write media it opens read-only: the drawing tools, Mark as Empty and the comment tool are hidden, and you can only look.
Find your way around the canvas
| Area | What it holds |
|---|---|
| The bar across the top | breadcrumbs, the version selector, and the Labels, Media Status and Filter buttons |
| The toolbar along the top of the image | selecting, panning, measuring, zoom, comments, rotation, full screen, undo and redo |
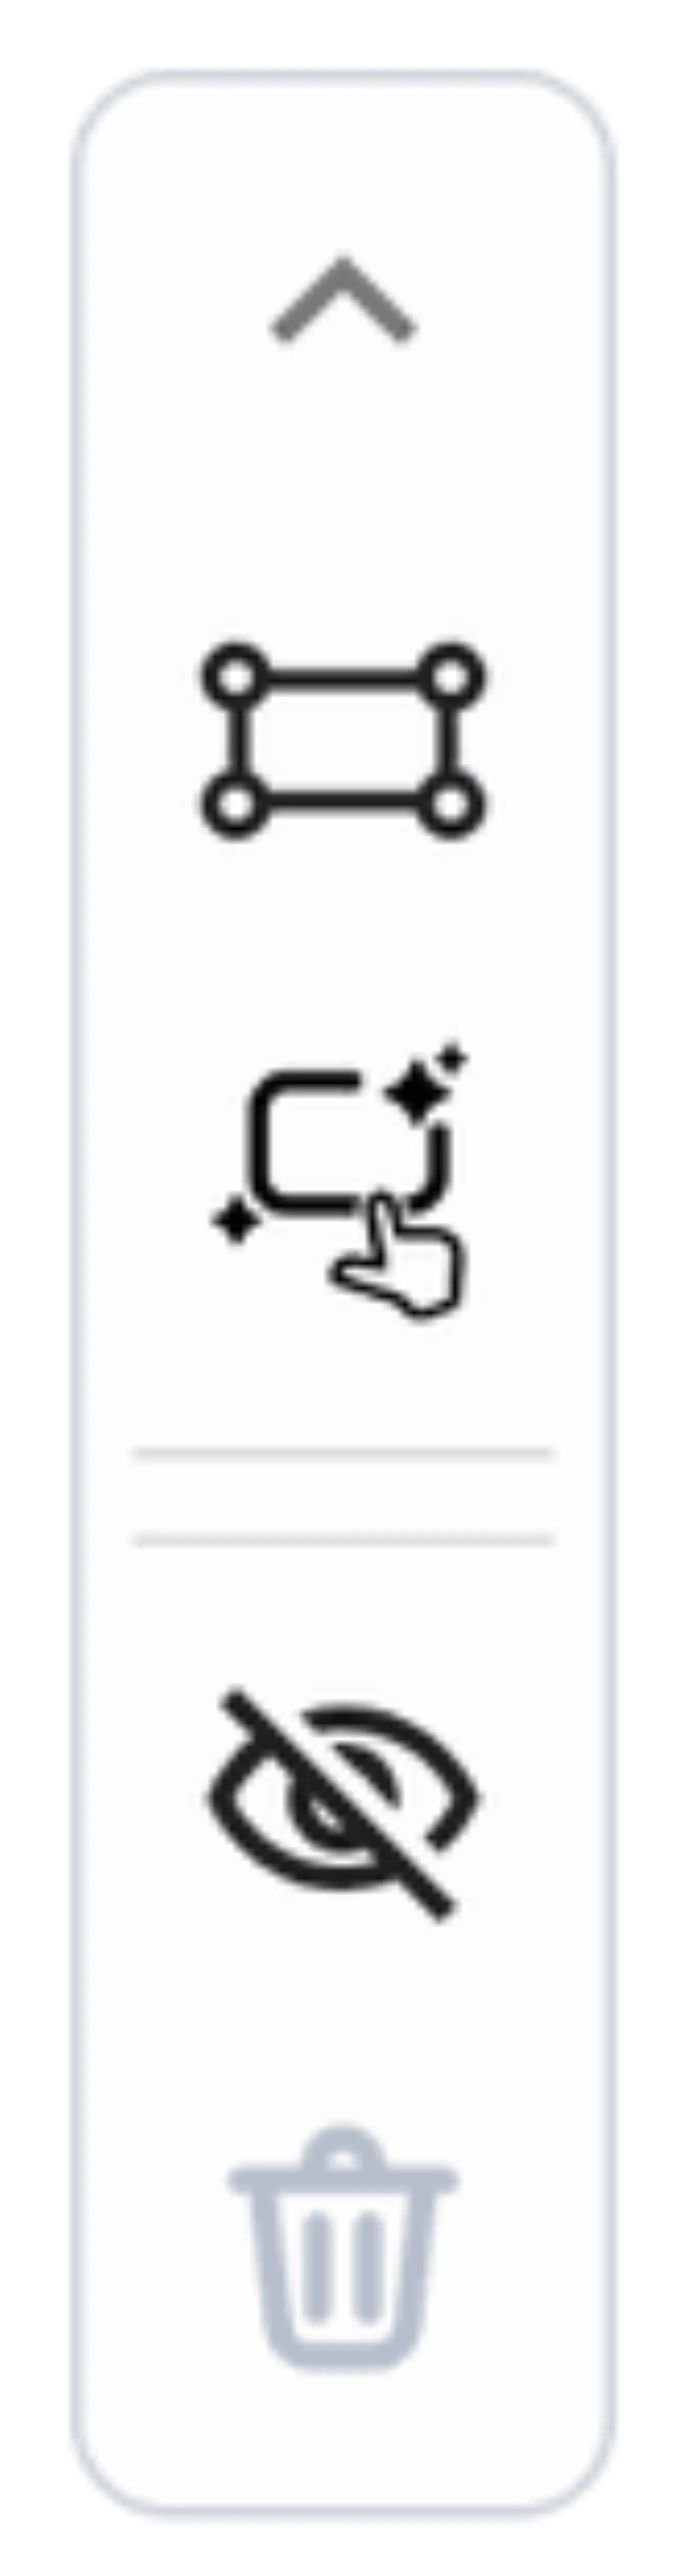
| The toolbar on the right edge of the image | the drawing tools, hide, and delete |
| The thumbnail strip | every image in view; it runs under the image, or down its side on very wide screens |
| The panel on the far right | image details, the classes and objects on this image, issues and display settings |
The far-right panel is covered in Classes and Image Settings.
Draw an object
- Pick a drawing tool in the toolbar on the right edge of the image.
- Draw the shape on the image.
- Check the class chip that appears on the new shape. Click it to choose a different class.
A new shape takes the class you used last, or the repository's first class if you haven't used one yet. Whatever class you pick from the chip becomes the one the next shape gets, so labeling a run of scratches only needs the class set once. If the repository has no classes yet, you're asked to create one first.
There is no save button. Each change is saved as you make it, and the first change moves you onto the repository's draft (see Drafts and Collaboration). If a save fails, the change is rolled back and a message says so. Undo and redo are greyed out for the moment a save is in flight.
To edit a shape, click it and drag its handles. To delete it, select it and press Delete, use the trash button in the right-edge toolbar, or use the bin on its row in the Objects list.
Choose a drawing tool
The toolbar only offers tools that fit the repository's task type. Hover a button to see its name and shortcut.
| Tool | Offered on | What it does |
|---|---|---|
| Rectangle Tool | object detection | draws a box |
| Smart Box | object detection | works out a box from your clicks |
| Brush Tool and Brush Eraser | segmentation | paints or erases a mask, with a Brush Width slider |
| Polygon Tool | segmentation | a closed shape, point by point |
| Polyline Tool | segmentation | an open line, point by point |
| Smart Polygon | segmentation | works out a mask from your clicks |
| Join Shapes Tool | segmentation | merges shapes; the tooltip changes to Merge Selected Shapes (Enter) once two are selected |
| Slice Shape Tool | segmentation | cuts a shape in two along a line |
Repositories without a fixed task type (shown as Repository) offer all of these. Anomaly-detection repositories get the segmentation set. Classification repositories have no drawing toolbar at all; you tag the whole image instead, from the class chips over the image or from the thumbnail strip.
The two smart tools are covered in Smart and Auto-Labeling.
Below the tools sit Hide Annotations (which becomes Show Annotations once pressed) and Delete Annotations. Delete only works with something selected. If you selected objects by clicking a class in the Labels card, you're asked to confirm first, because that deletes every object of that class on the image.
Adjust the view
The toolbar along the top of the image changes how you look at it. None of it changes the labels.

| Control | What it does |
|---|---|
| Arrow Tool | selects objects |
| Pan Tool | drags the image around (holding the middle mouse button does the same with any tool) |
| Measurement Tool | draws a measuring line in pixels, with line colour and weight settings |
| Line Profile | draws a line and charts the pixel values along it, with length, min, max, mean, median, standard deviation and SNR |
| Magnifier | a loupe that follows the cursor |
| Rotate Left, Rotate Right | turn the image a quarter turn |
| Zoom | zoom in and out, or type a percentage; the menu holds Scale to fit and Actual size |
| Full Screen | hides everything except the image and its toolbars |
| Comment | drops a comment pin on the image |
| Undo, Redo | step back and forward through your changes |
Mark an image as empty
Some images have nothing to label, and a blank image looks the same as one nobody has reached yet. Mark as Empty, at the top left of the image, records that the image was checked and has no objects.
It removes any shapes already on the image, so use it on purpose. Once an image is marked, the button reads Marked as Empty with a tick and is greyed out until you draw something again. In the repository, the image shows No objects to label instead of No label.
Move between images
Click a thumbnail in the strip, or press the left and right arrow keys (up and down on very wide screens, where the strip runs vertically). More thumbnails load as you scroll.
Videos appear in the strip too. Expand one to step through its frames.
A thumbnail carries a Correct or Incorrect badge once a reviewer has judged that image in a review task. See Reviewing Labeled Work.
To narrow the strip, use the buttons in the top bar. Media Status filters to Labeled or Unlabeled images and shows how many of each there are. Filter adds a pinned-images-only switch, a labeler filter and name or label conditions; click Apply Filters to use them or Clear All to reset.
Keyboard shortcuts
Every shortcut is also shown in its button's tooltip. On a Mac, Cmd works where this table says Ctrl for the tool shortcuts.
| Shortcut | Action |
|---|---|
Ctrl + D |
Rectangle Tool |
Ctrl + O |
Smart Box |
Ctrl + B |
Brush Tool |
Ctrl + E |
Brush Eraser, and also Full Screen |
Ctrl + U |
Polygon Tool |
Ctrl + L |
Polyline Tool |
Ctrl + S |
Smart Polygon |
Ctrl + J |
Join Shapes Tool, then Enter to merge |
Ctrl + K |
Slice Shape Tool |
Ctrl + H |
hide or show annotations |
Delete |
delete the selected objects |
Tab |
select the next object |
Ctrl + A |
Arrow Tool |
Ctrl + P |
Pan Tool |
Ctrl + M |
Measurement Tool |
Alt + M |
Magnifier |
Alt + L |
Line Profile |
Alt + C |
Comment |
Alt + ← · Alt + → |
rotate left · rotate right |
Ctrl + = · Ctrl + - |
zoom in · zoom out |
Ctrl + F · Ctrl + G |
scale to fit · actual size |
Ctrl + Z · Ctrl + Y |
undo · redo |
← · → |
previous · next image |
A few overlap. Ctrl + E both toggles full screen and picks the eraser on a segmentation repository. Ctrl + M and Alt + M are different tools, as are Ctrl + L and Alt + L. Classes can have their own shortcuts too; see Classes and Image Settings.
Shortcuts pause while a dialog is open over the canvas and while you're typing in a field.