Drafts and Collaboration
Understand where your labels are saved, compare against the original, and label, comment and invite alongside your team.
Labeling never overwrites a saved version of a repository. Your changes collect in a draft on top of the version you opened, and stay there until someone saves the draft as a new version. The draft is shared, which is also what lets several people label the same repository at once.
Know which version you're labeling
The bar at the top of the canvas shows the version you're on, next to the breadcrumbs. Open it to see the repository's other versions; the one you're on is marked current.
Once the version has a draft, a switch button appears at the right end of the bar. It's highlighted while you're looking at the draft, and its tooltip says where it will take you: Switch to original version or Switch to draft version.

If there's no switch, the version has no draft yet.
Know where your edits go
There's no save button on the canvas. Every shape you draw, edit or delete is saved as you go.
The first change you make while looking at the original moves you onto the draft (creating it if needed), and a message says You are switching to draft version. From then on you stay on the draft.
That means:
- The version you opened is untouched, so there's always a saved state to compare against.
- Everyone labeling the repository writes into the same draft.
- Closing the tab loses nothing. The draft is on the server, not in your browser.
Compare an image with the original
When the image you're on has changed in the draft, a Show Original button appears next to its name in the Image details card. It opens an Original Image window with the image as it is in the saved version, read-only.
If the image was added in the draft, the window says The image is not included in the original dataset and it is only available in the draft version.
Save the draft as a version
Saving happens on the repository page, not on the canvas.
- Open the repository. If you're looking at the original, click Switch to draft.
- Click Save draft.
- Confirm with Save.
The draft becomes the repository's next version. Save draft needs permission to write media, and the same buttons appear on the repository's task pages. The full version workflow is in Repository Details and Versions.
Starting auto-labeling, or training a model from the draft, saves the draft as a version first, so the model always works from a saved version.
Label at the same time as your team
When two people have the same image open, each sees the other's cursor moving over it, labelled with their name or email, and sees shapes appear as they're drawn. The Image details card lists who's there under Active Users (or No active users).
This needs a plan that includes labeling collaboration. Without it you still share the draft; you just don't see each other live.
Someone who can read media but not write it can open the canvas and look, but can't draw, comment or change anything.
Comment on an image
Comments let you ask about a spot on an image without touching its labels.
- Click Comment in the toolbar above the image, or press
Alt + C. - Click the spot you want to talk about. A pin drops there.
- Type in Add a comment and press
Enter(or click Send).
Shift + Enter starts a new line. Type @, or use the Tag button, to mention someone with access to the repository.
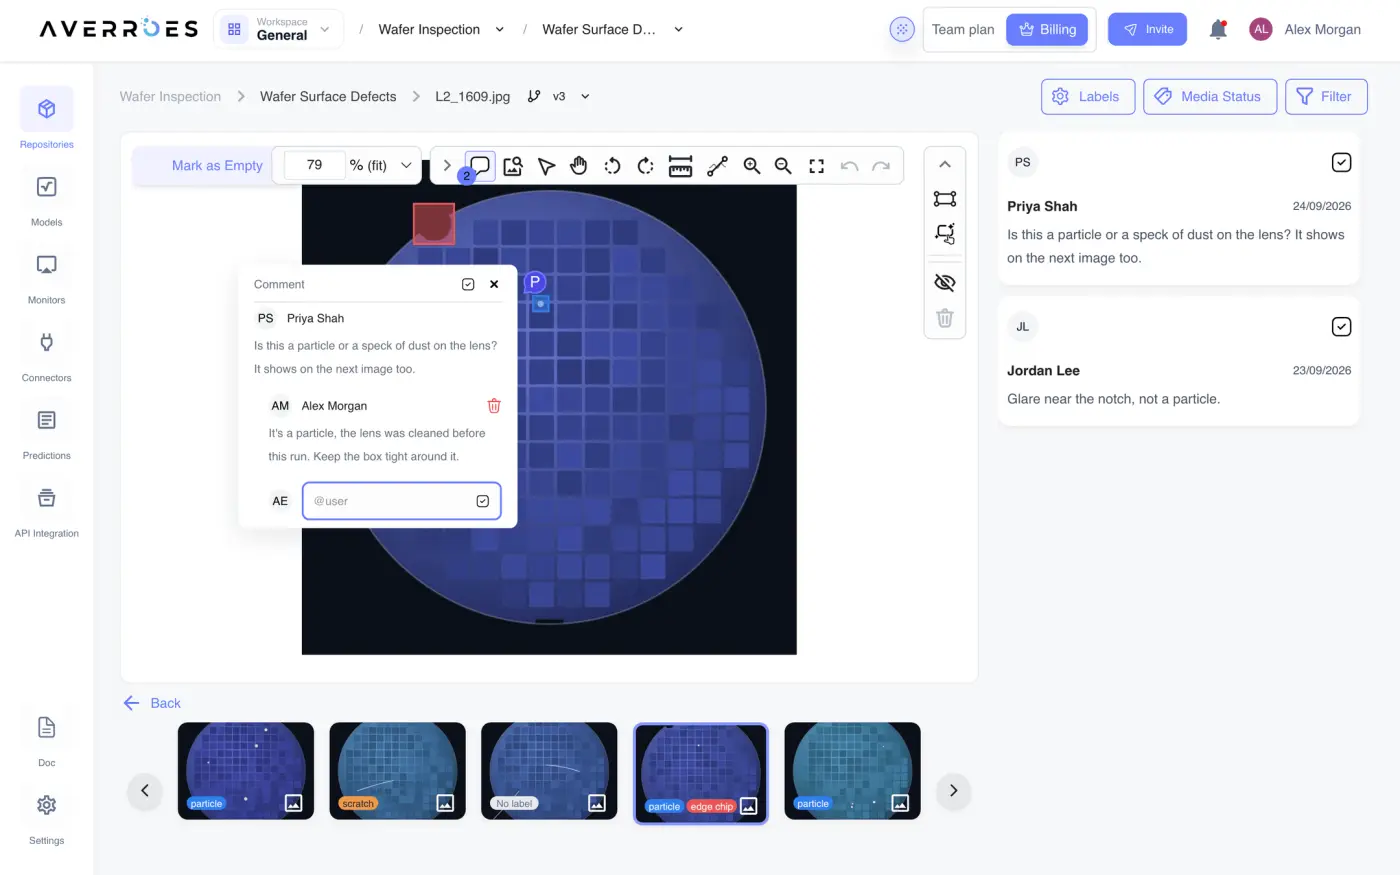
While the comment tool is on, the right-hand panel lists every comment thread on the image (or There are no comments yet on this media.). Click a thread to jump to its pin. From a thread you can reply, Resolve it once it's dealt with, or Delete a comment you wrote. Pins stay where they were placed, so a note about one corner of a wafer stays on that corner.
The comment tool is hidden for anyone who can't write media.
Invite someone to an image
To bring a teammate to the exact image you're on:
- Click Invite to collaborate (the person icon) in the Image details card.
- Choose them under User in the Invite User to Collaborate dialog.
- Click Invite.
They're sent a link that opens this image, with the version and filters you had. The list only holds other members of the project; if there's nobody else, it says There are no other project members available to invite.
Inviting needs permission to write media and to read users. Without both, the button is disabled and hovering it names what's missing.