Plans and Billing
Change or cancel your plan, pay for it, manage cards and the billing address, download invoices, and buy extra storage.
Billing is spread over two settings tabs. Overview holds your current plan and storage, and it's where you change plan. Invoices holds your cards, billing address and invoice history. Everything here is about the whole workspace, not just your account.
Change your plan
- Open settings and stay on Overview.
- Click Change Your Plan on the Current Plan card (it reads Upgrade Your Plan on a free plan).
- Use the Monthly / Yearly switch to choose the billing cycle. The Yearly side shows how much you save.
- Click Choose on the plan you want.
On a free plan, the Upgrade button in the header takes you straight to this page.
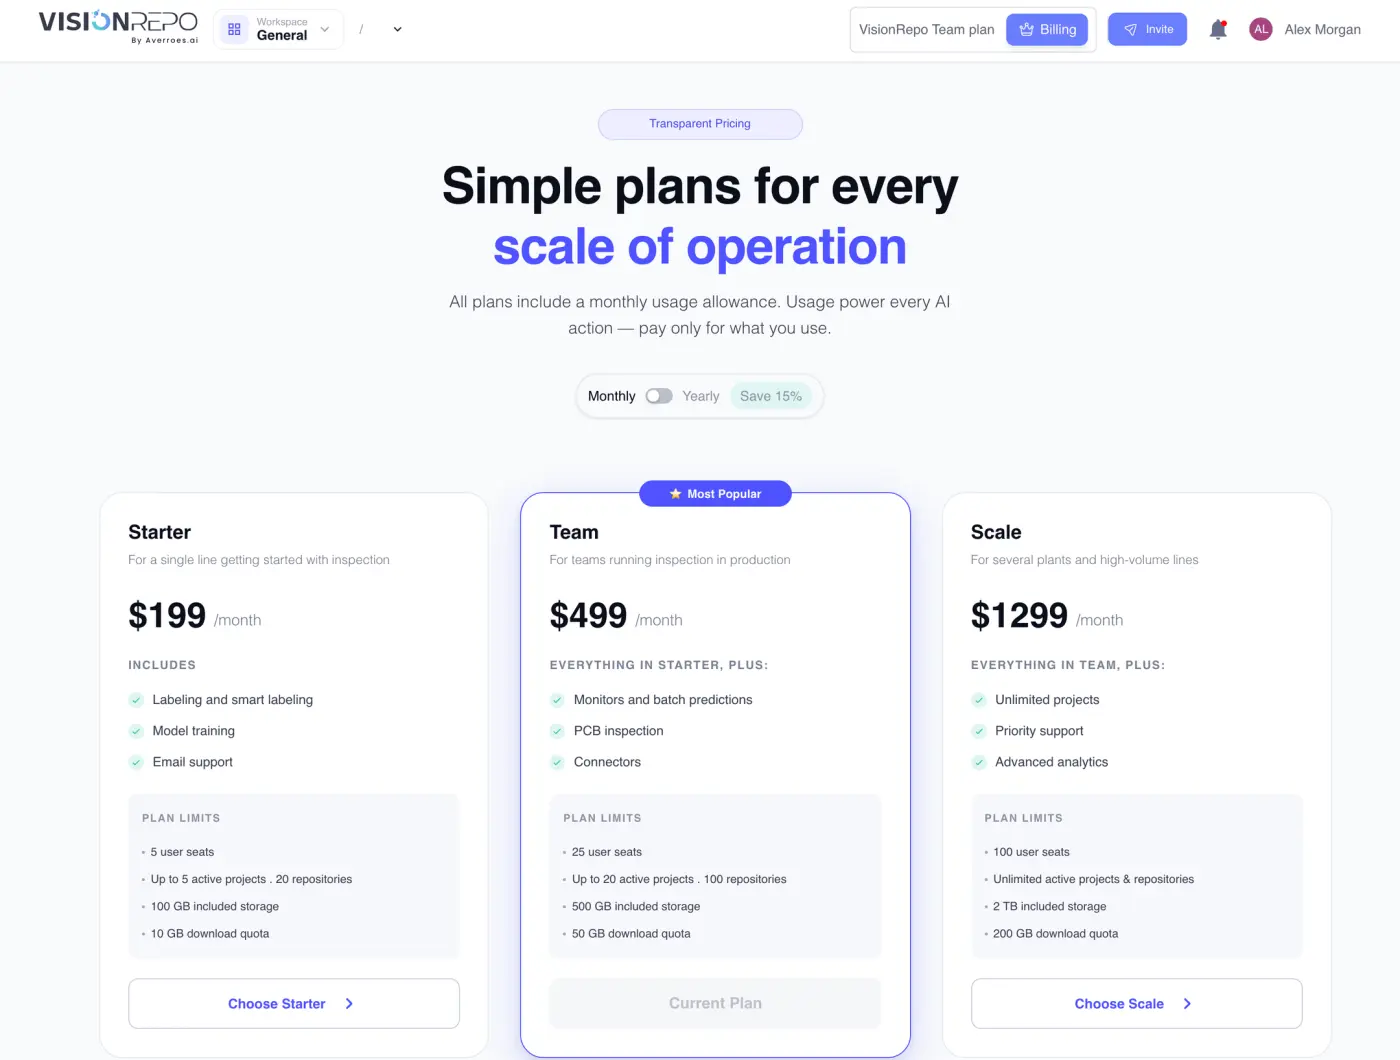
Each card lists what the plan adds and, under Plan limits, its seats, projects and repositories, storage and download quota. Comparing those lists is the quickest way to see what a move gets you. Further down the page you'll find how usage works, answers to common billing questions, and Talk to Sales → and Billing Support → if you want to speak to someone.
What the button on each card says:
- Current Plan is the plan and cycle you're on. It's disabled.
- Choose followed by the plan name switches you to that plan.
- "(switch billing cycle)" after the name means it's your current plan on the other cycle.
Changing plan needs write access to billing, unless you're a workspace super admin. Without it the buttons are greyed out and hovering them names the missing permission. If you open the picker without that access, you're sent back to Overview.
Upgrade and pay
Choosing a more expensive plan takes you to checkout.
- Check the summary on the right: the plan, Monthly or Yearly, what's included and the Total. Change Plan takes you back to the picker.
- Under Payment Details, select the card to charge, or click Add payment method and enter a new one.
- Click Complete Purchase.
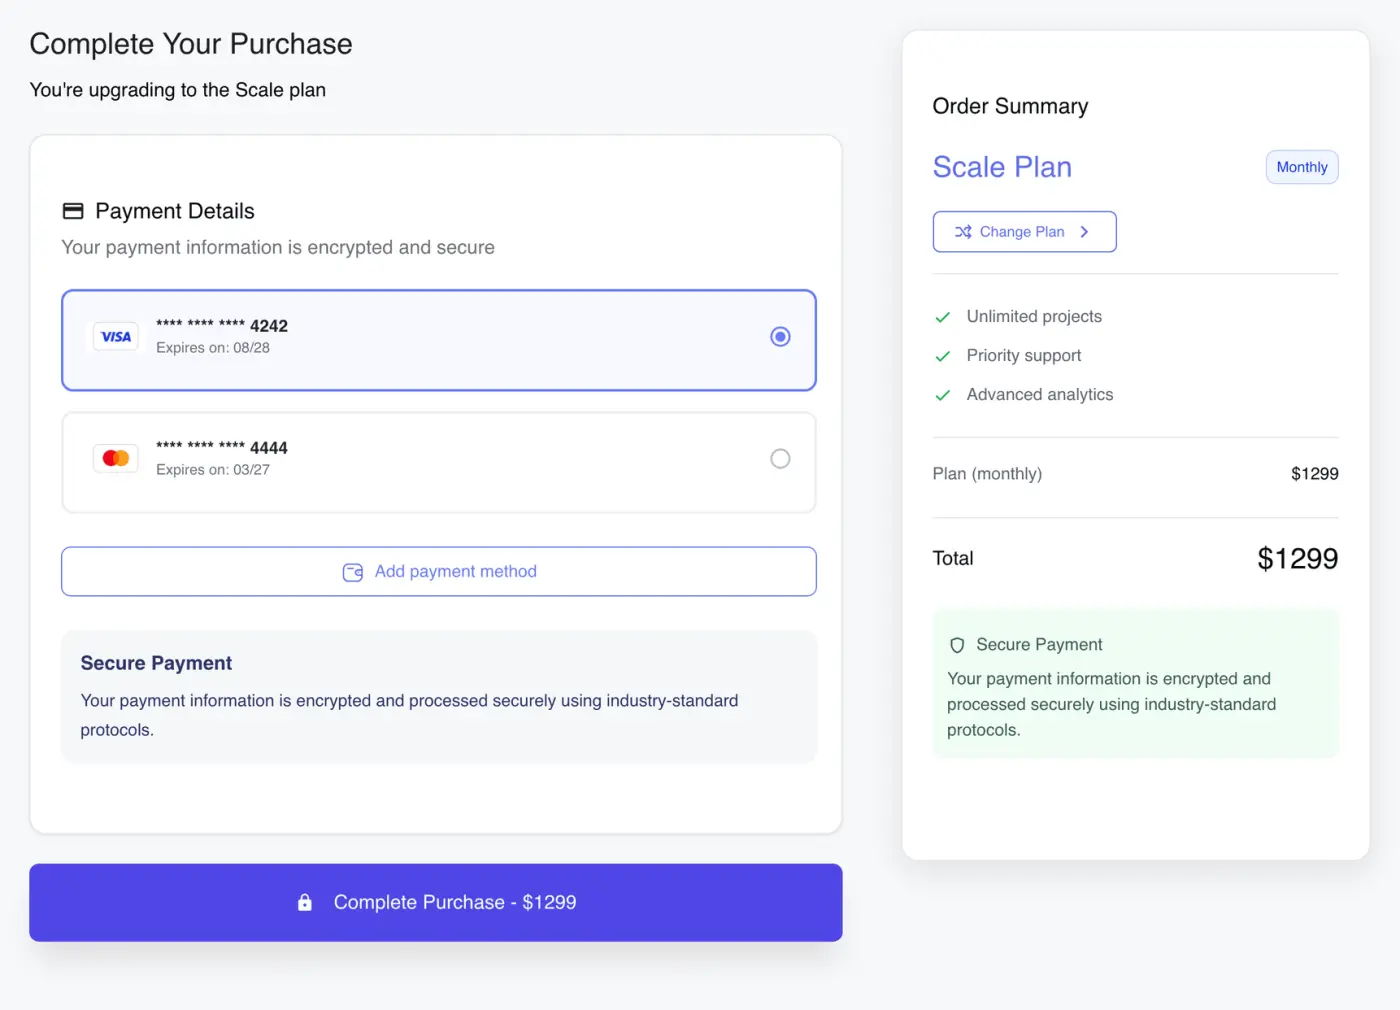
Card details are handled by Stripe, the payment provider. The platform never stores the card number.
If your bank asks you to confirm the payment (3D Secure), you're sent to your bank's page and brought back afterwards. A "Completing Authentication" screen follows, then either a success message or "Authentication Failed" with Go Back and Billing Settings buttons. If the bank declines or you cancel, nothing is charged and your plan stays as it was.
Some payments take a while to clear. You'll then see "Payment is being processed", and the new plan starts once the money arrives.
When it works, a welcome page confirms the new plan, with Download Receipt and Go to dashboard. It takes you to the dashboard by itself after a short countdown.
Paying needs write access to both billing and the subscription, unless you're a super admin.
Downgrade to a smaller plan
Choosing a cheaper plan asks you to confirm first, in the Confirm Plan Change dialog. Click Confirm Downgrade to go ahead, or Keep My Plan to back out. For a paid plan you then go through checkout as above. For a free plan there's nothing to pay, so the change is recorded and you're taken back to the home page.
You keep your current plan and all its features until the end of the billing period you've paid for. After that the workspace moves to the smaller plan by itself. Until then the Current Plan card shows Next plan and a note saying the downgrade is coming.
To call it off, click Cancel Downgrade Plan on the card and confirm.
Check your usage before downgrading. If you have more members, projects, repositories or storage than the smaller plan allows, you'll be over its limits once it starts.
Cancel or resume the subscription
Cancel Subscription only appears on the Current Plan card after a payment has failed (see below). The confirmation warns that you'll lose the plan's features and be downgraded straight away. Keep My Plan backs out; Cancel Plan goes ahead.
If a cancellation is scheduled, the card shows a Cancellation date and a Resume plan button. Click it and confirm with Resume subscription to keep your plan.
Settle a failed payment
If a renewal can't be charged, the subscription goes past due. The Current Plan card shows a warning, and a Past due payment button appears in the header.
- Click Pay Now on the Current Plan card (the header button takes you there).
- Pick a working card, or add one, at checkout.
- Click Complete Purchase.
This pays for your current plan; it doesn't move you to a different one. Don't leave it too long: the warning on the card says you can lose access to the account if the payment method isn't fixed.
Manage payment methods
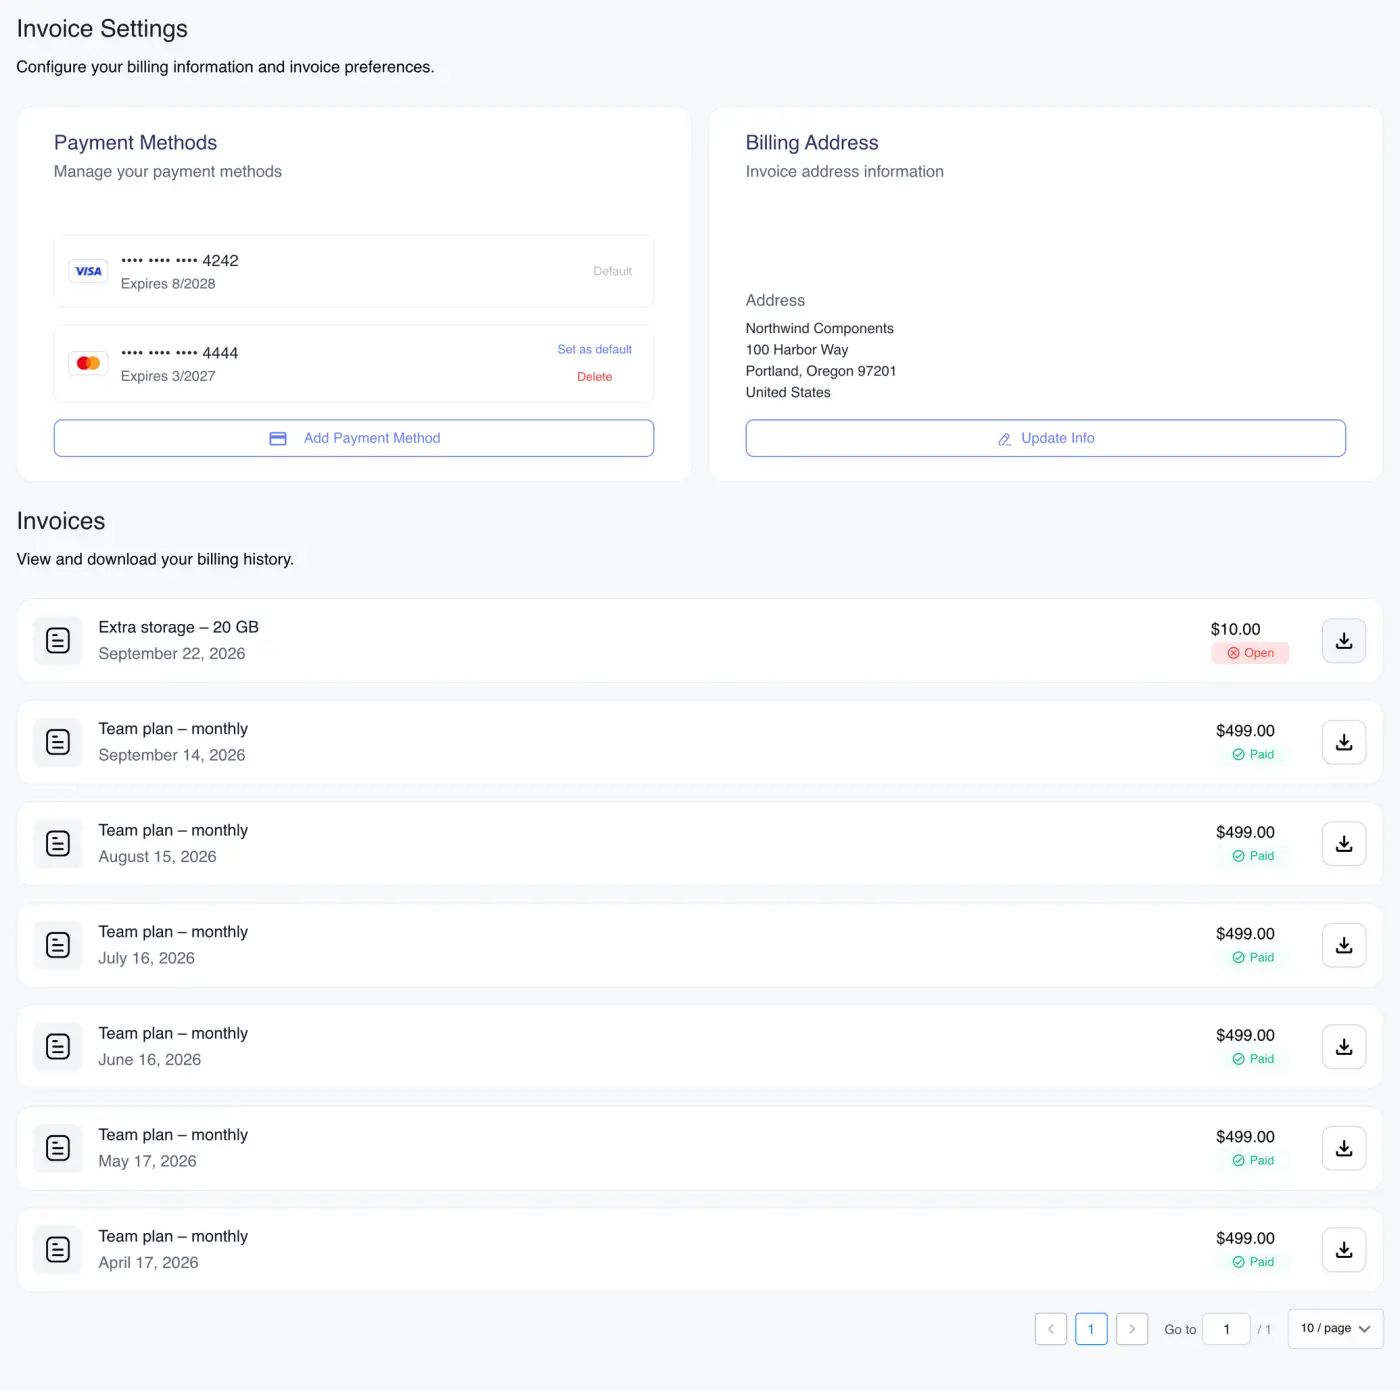
Open the Invoices tab. Payment Methods lists the cards saved for the workspace, showing the last four digits and the expiry date.
- Add Payment Method opens a card form.
- Set as default makes a card the one renewals are charged to. The current one is labeled Default.
- Delete removes a card after you confirm. The default card can't be deleted; make another card the default first.
Update the billing address
The address printed on your invoices is under Billing Address on the Invoices tab.
- Click Update Info.
- Fill in Company Name, Address, City, Postal Code, Country and State.
- Click Save.
The change applies to upcoming invoices. Invoices you already have aren't reissued.
Download an invoice
Invoices, lower on the same tab, is your billing history with the date, amount and status of each. Click the download button on a row to save the PDF.
Only invoices marked Paid can be downloaded. The button is disabled on anything else. Invoices for a zero amount aren't listed.
Viewing and downloading invoices needs read or write access to billing. Adding cards and changing the address need write access, and those controls are greyed out without it.
Buy extra storage
If you need more space than your plan includes, add extra storage to it instead of changing plan. It's billed monthly on top of your subscription.
- On Overview, click Add Extra Storage on the Storage card.
- Pick one of the preset sizes, or type a whole number of gigabytes in Custom storage (GB).
- Check the Estimated cost, which updates as you change the amount.
- Choose a card under Payment Method, or Add new Card.
- Click Add Extra Storage.
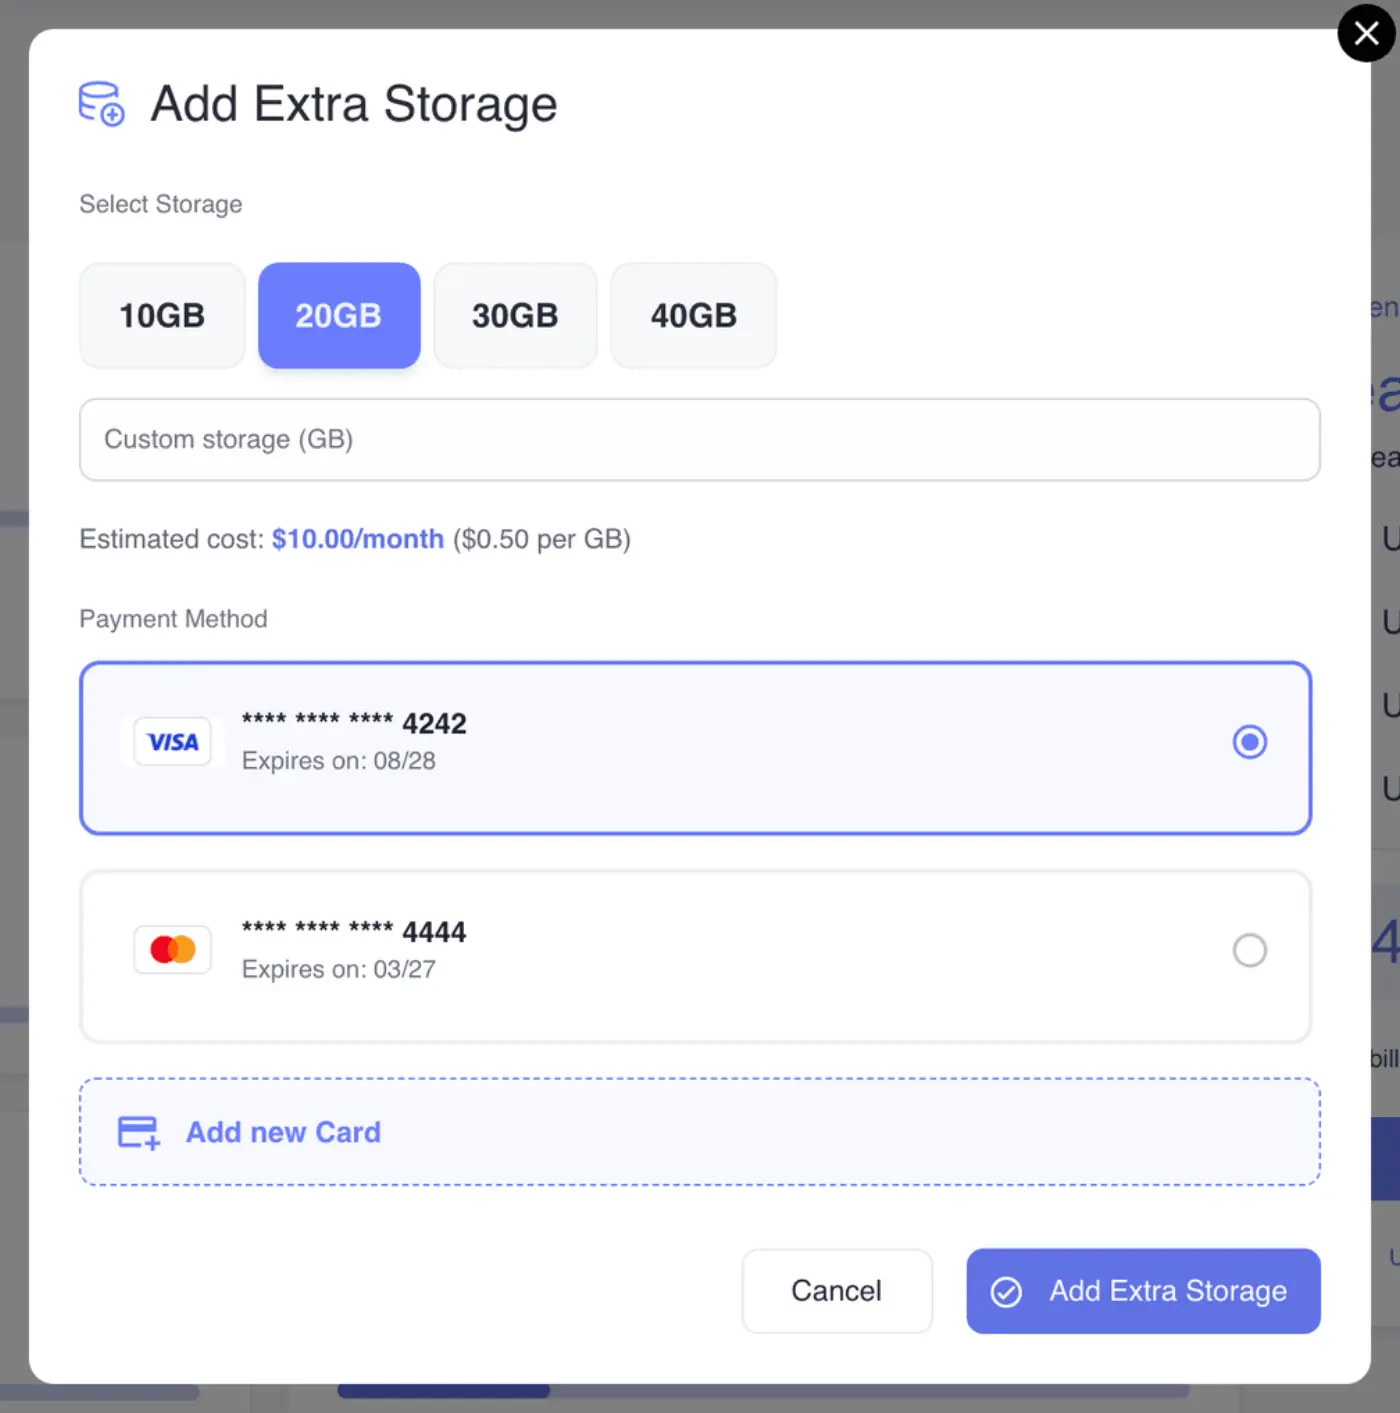
Once you have extra storage, the Storage card shows it with its size and its own bar. That bar only starts to fill once the plan's own storage is full.
You can also add extra storage from the upload dialog when an upload wouldn't fit. See Upload and Import Data.
Change or remove extra storage
Edit on the Storage card reopens the picker at your current size.
- More storage takes effect straight away and is charged then, so you choose a card.
- Less storage is scheduled for the end of the billing period, and no card is needed. The dialog warns you under Reducing storage and the button reads Reduce Anyway. Until then the card says when the change happens, with a Cancel button to keep your current size.
- Removing it (the bin icon, then Delete in Delete Extra Storage) is also scheduled for the end of the period. The card shows the removal date and a Cancel button.
You can't remove extra storage while you're using it. If your data has spilled past the plan's allowance, the bin is disabled and hovering it tells you how much to free up.
If a payment for extra storage fails, the card shows Past Due and "Payment failed for your extra storage", with the date retries stop. Click Retry Payment, pick a card and click Pay Now. Editing is switched off until it's paid.
Every extra-storage action needs write access to billing. Without it the buttons are greyed out with a tooltip naming the missing permission, and people with no billing access don't see them at all.
Buy labeling credits
Auto-labeling runs on credits. When a run needs more than you have, an Insufficient Credits dialog shows your balance and the amount needed, with preset credit packs. Continue to Checkout takes you to a checkout page for the pack. See Smart and Auto-Labeling.
Daily allowances, extra usage and your prepaid balance are covered in Usage and Limits.